
Rust for JavaScript developers: AppConfig code comparison

I am an AWS serverless community builder. I worked around Europe in public and private sector projects, and I have also been around for a while when Agile or Unit Tests were not a word.
I use this blog to share my ideas and create collaboration.
Feel free to contact me anytime.
This blog post is the first mini-series of code comparisons between Node.js and Rust, and on this blog post, I will talk about AWS AppConfig
As a part of the mini-series Rust for JavaScript developers you can check out the other parts:
- Part 1 I have shown a basic comparison for AWS SQS.
I intend to keep the mini-series focused on Lambda integration, and each of the blog posts is isolated from the other.
Why
In the last few years, I have switched languages multiple times between .NET, JavaScript and Rust, and the knowledge acquired with one language is transferable to a new one. Therefore, we need mentally map the similarity to pick it quickly.
Because I was doing this with a friend who was curious to see Serverless Rust in action, I wrote small posts about it.
The Basic
Rust is coming with many built-in features, for example:
| JS | Rust |
| npm | cargo |
| npm init | cargo init |
| npm install | cargo install |
| npm run build | cargo build |
| package. json | Cargo.toml |
| package-lock. json | Cargo.lock |
| webpack | cargo build |
| lint | cargo clippy |
| prettier | cargo fmt |
| doc generation | cargo doc |
| test library like jest | cargo test |
Generate a new SAM based Serverless App
sam init --location gh:aws-samples/cookiecutter-aws-sam-rust
AWS AppConfig
Currently, there is no official example from the AWS Rust team (at least I did not see it).
Official examples for Node.js that I found are:
It is like this:
const AWS = require('aws-sdk');
const appconfig = new AWS.AppConfig();
const http = require('http');

exports.handler = async (event) => {
  const result = await new Promise((resolve, reject) => {
    http.get("http://localhost:2772/applications/applicationTest/environments/ myTestEnvironment/configurations/myConfigurationProfile", resolve);
  });

  const configData = await new Promise((resolve, reject) => {
    let data = '';
    result.on('data', chunk => data += chunk);
    result.on('error', err => reject(err));
    result.on('end', () => resolve(data));
  });

  console.log(configData);
  return JSON.parse(configData);
};
Based on my experience, the best way to use AWS AppConfig in your code is to share the config already loaded in the Lambda Context. This technique will allow you to avoid hitting the AWS AppConfig endpoint at all.
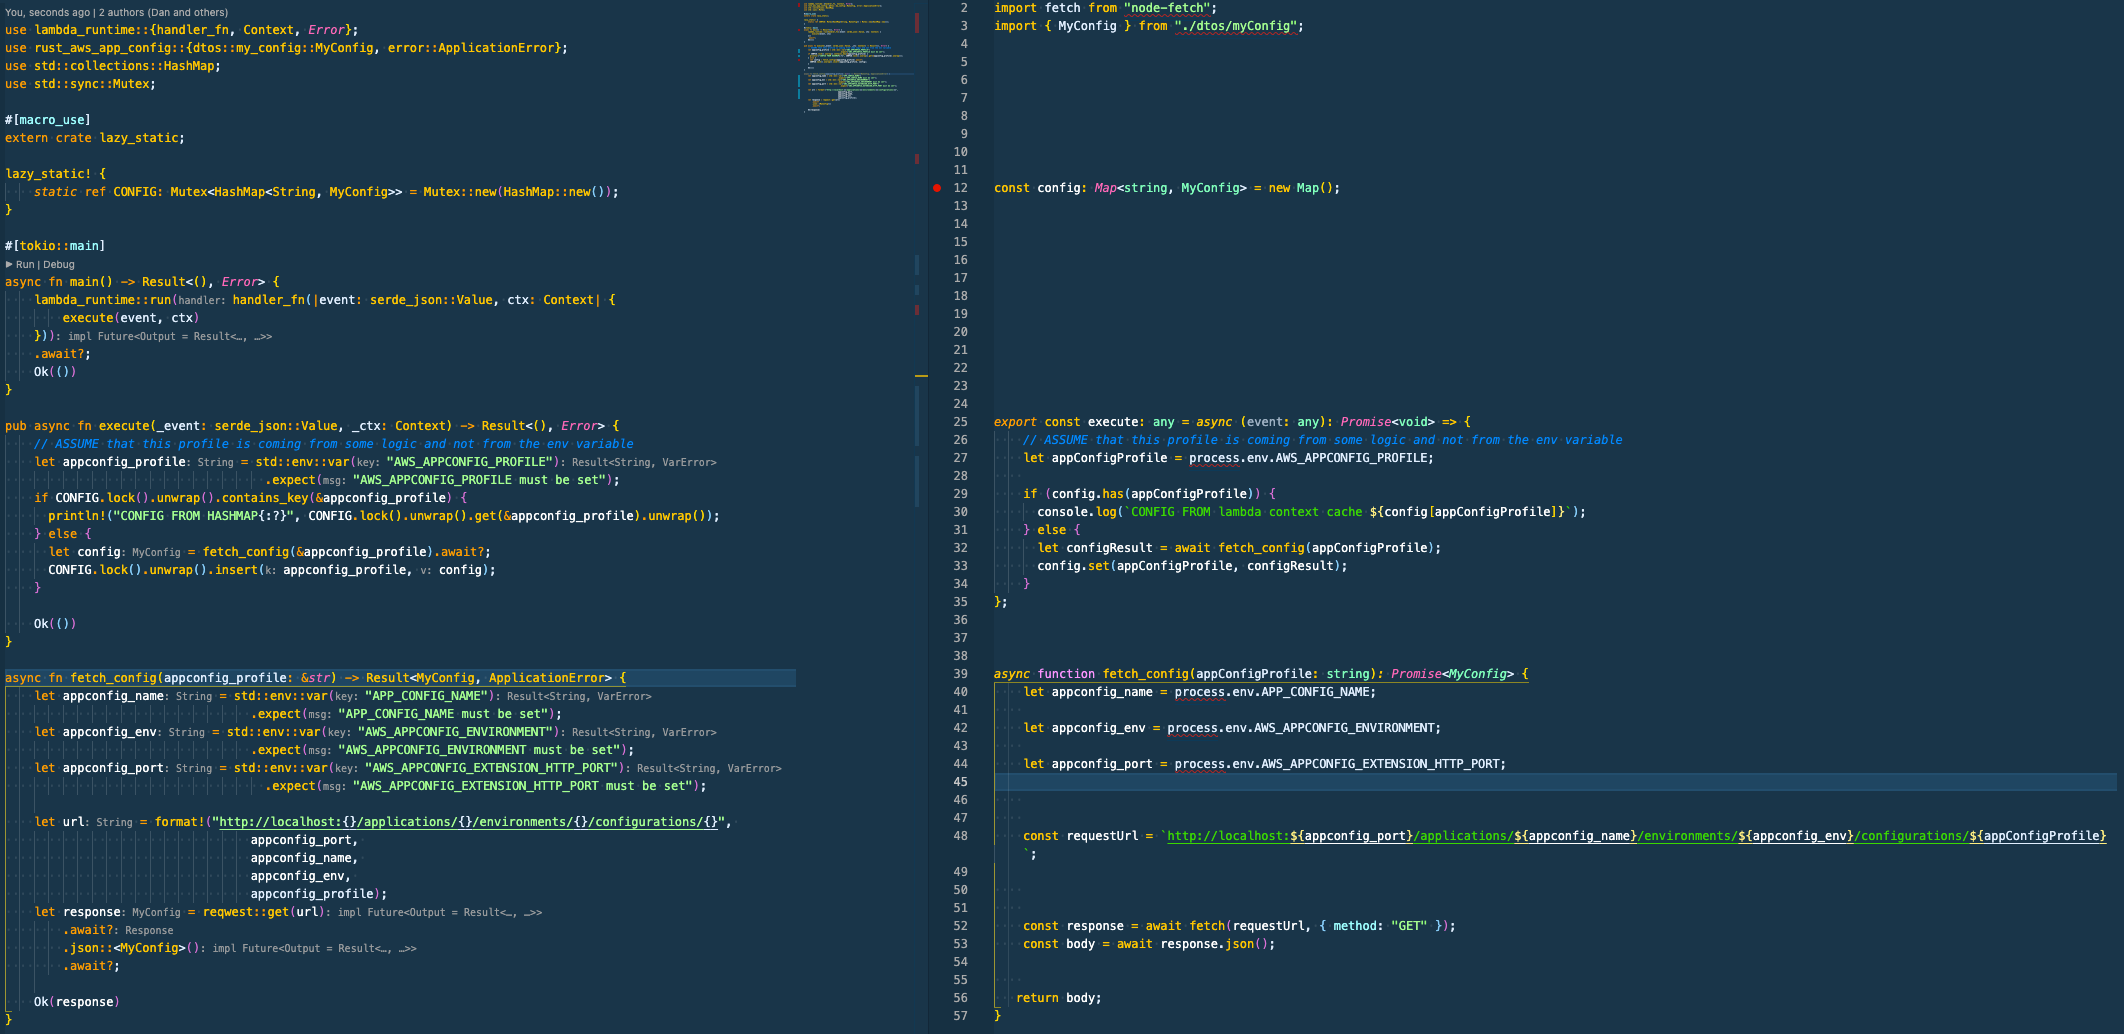
Rust is more verbose.
use lambda_runtime::{handler_fn, Context, Error};
use rust_aws_app_config::{dtos::my_config::MyConfig, error::ApplicationError};
use std::collections::HashMap;
use std::sync::Mutex;
After the imports, we have the main() method.
#[tokio::main]
async fn main() -> Result<(), Error> {
  lambda_runtime::run(handler_fn(|event: SqsEvent, ctx: Context| {
    execute(event, ctx)
  }))
  .await?;

  Ok(())
}
When the Lambda service calls your function, an execution environment is created. As your lambda function can be invoked multiple times, the execution context is maintained for some time in anticipation of another Lambda function invocation. When that happens, it can "reuse" the context, and the best practice is to use it to initialize your classes, SDK clients and database connections outside. This saves execution time and cost for subsequent invocations (Warm start).
Finally, the code that we are interested in:
pub async fn execute(_event: serde_json::Value, _ctx: Context) -> Result<(), Error> {
    // ASSUME that this profile is coming from some logic and not from the env variable
    let appconfig_profile = std::env::var("AWS_APPCONFIG_PROFILE")
                                    .expect("AWS_APPCONFIG_PROFILE must be set");
    if CONFIG.lock().unwrap().contains_key(&appconfig_profile) {
      println!("CONFIG FROM HASHMAP{:?}", CONFIG.lock().unwrap().get(&appconfig_profile).unwrap());
    } else {
      let config = fetch_config(&appconfig_profile).await?;
      CONFIG.lock().unwrap().insert(appconfig_profile, config);
    }

    Ok(())
}

async fn fetch_config(appconfig_profile: &str) -> Result<MyConfig, ApplicationError> {
    let appconfig_name = std::env::var("APP_CONFIG_NAME")
                                  .expect("APP_CONFIG_NAME must be set");
    let appconfig_env = std::env::var("AWS_APPCONFIG_ENVIRONMENT")
                                  .expect("AWS_APPCONFIG_ENVIRONMENT must be set");
    let appconfig_port = std::env::var("AWS_APPCONFIG_EXTENSION_HTTP_PORT")
                                    .expect("AWS_APPCONFIG_EXTENSION_HTTP_PORT must be set");

    let url = format!("http://localhost:{}/applications/{}/environments/{}/configurations/{}",
                                  appconfig_port,
                                  appconfig_name,
                                  appconfig_env,
                                  appconfig_profile);
    let response = reqwest::get(url)
        .await?
        .json::<MyConfig>()
        .await?;

    Ok(response)
}
It is pretty much the same, just syntax using a formatting Rust is 10 lines long because split the line to avoid being so long.
If you are wondering about the following:
lazy_static! {
    static ref CONFIG: Mutex<HashMap<String, MyConfig>> = Mutex::new(HashMap::new());
}
The lazy_static crate is a simple but widely used macro that initializes static variables at runtime. Using this macro, it is possible to have statics that requires code to be executed at runtime to be initialized. This includes anything requiring heap allocations, like vectors or hash maps, and anything that requires non-const function calls to be computed.
Please read from the sources:
Conclusion
On my GitHub profile, you can find an example of how I got to this version of the code RUST + AWS AppConfig, where I experiment from initializing AWS AppConfig in and outside of the Lambda Context and how adding the already loaded config in the Lambda context will cut performances down to 4ms.
It is well known that Rust is one the faster runtime for Serverless applications, and we are not here to discuss it. Instead, this series will compare parts of the code used in typical serverless applications to show that your skill sets can be reused no matter the language apart from the syntax you can learn. Having the same code written in different languages helps me move quickly to Rust, and I hope it will help you facilitate the migration to Rust.